Wie war dieser Inhalt?
Sprache des Inhalts
Im Moment sind nicht alle Inhalte übersetzt.
- Lernen
- Prove It, Part 3: A step-by-step guide to automated reasoning implementation
Prove It, Part 3: A step-by-step guide to automated reasoning implementation

In this guide, you'll find out how to create an automated reasoning policy from an existing business document, deploy it through Amazon Bedrock Guardrails, validate LLM responses with ApplyGuardrail, build an audit trail, and secure AI agents with AgentCore Policy. Using this process, teams can go from compliance document to production verification in just 30 minutes.

In Part 1 ("Why 'Probably Correct' Is Not Good Enough") we covered why startups need deterministic verification. In Part 2 ("Formal Logic, Cedar Policies, and the Economics of Verification") we explained the verification pipeline and the math behind it. Now it’s time to build.
What do you need before you begin?
Before you start, make sure you have the following:
- An AWS account with Amazon Bedrock access. If you are part of AWS Activate, you already have credits for this.
- Python 3.9+ with boto3. If you shipped an MVP, you have this.
- A policy document (PDF, Markdown, or plain text) describing your business rules. If you have passed any compliance review or investor due diligence, you have this.
Step 1: Create your AR policy
The fastest path is through the AWS Console. You do not need to write formal logic, as Bedrock translates your source document into formal logic rules automatically.
- Open the Bedrock console and navigate to Automated Reasoning in the left sidebar.
- Create a new policy. Give it a descriptive name (e.g., mortgage-eligibility-policy).
- Upload your source document. This is the PDF, Word doc, or plain text file that describes your business rules. For a fintech startup, this might be your lending criteria document. For healthcare, your clinical protocols.
- Provide instructions. Write a brief intent describing what the policy validates, and include 2-3 example question-and-answer pairs. These help the system understand how users will interact with the policy.
For teams that prefer not to use the console, there is also a conversational interface for policy creation that walks you through formalization in natural language. It has a few prerequisites (including Kiro-CLI) but removes the console entirely from the workflow.
Example intent:
This policy validates mortgage eligibility questions. Users ask about whether customers qualify for specific mortgage types based on their financial details.
Example Q&A:
Q: A customer wants to purchase a $350,000 USD house with $30,000 USD down. Do they qualify for a conventional mortgage?
A: No. Conventional mortgages require a minimum 20 percent down payment ($70,000 USD for a $350,000 USD purchase).
Review the fidelity report:
After the system processes your document, it generates a fidelity report with two scores:
- Coverage score (0.0 to 1.0): how much of your source document is represented in the policy
- Accuracy score (0.0 to 1.0): how faithfully the extracted rules match your document's intent
The report also shows the specific variables and rules extracted, with grounding back to exact statements in your source document. This is where you check that the system understood your rules correctly.
Refine your variable descriptions using real examples from your application. Test representative questions, inspect how the system translates them, and improve descriptions wherever translations miss the mark. This is the single biggest lever for accuracy. Include units, synonyms, conversion rules, and domain-specific terminology wherever possible. A description like "The borrower's down payment as a percentage of purchase price; when users mention dollar amounts, convert using (downPayment / purchasePrice) * 100" outperforms "How much the borrower is putting down."
This is not a multi-sprint engineering effort. It is 30 minutes from your existing compliance document to a working AR policy. Iterate on variable descriptions and test with sample questions until the fidelity scores and test results match your expectations.
For the API path (useful for CI/CD pipelines), see the CreateAutomatedReasoningPolicy API reference. The API takes a name, optional description, and a policyDefinition containing rules, variables, and custom types.
Step 2: Deploy to a guardrail
Once your policy tests well, deploy it for production use.
Save an immutable version. In the console, choose "Save as new version." This creates a numbered, immutable snapshot (version 1, 2, 3...) so your production guardrail is not affected when you continue editing the DRAFT. This is how startups ship safely at speed: your compliance team reviews version 1 in production while your engineering team iterates on version 2 in draft. No deployment freezes, no "please do not touch the policy until we ship."
Once you've published a version of your policy, attach it to a guardrail so it can be used during runtime validation:
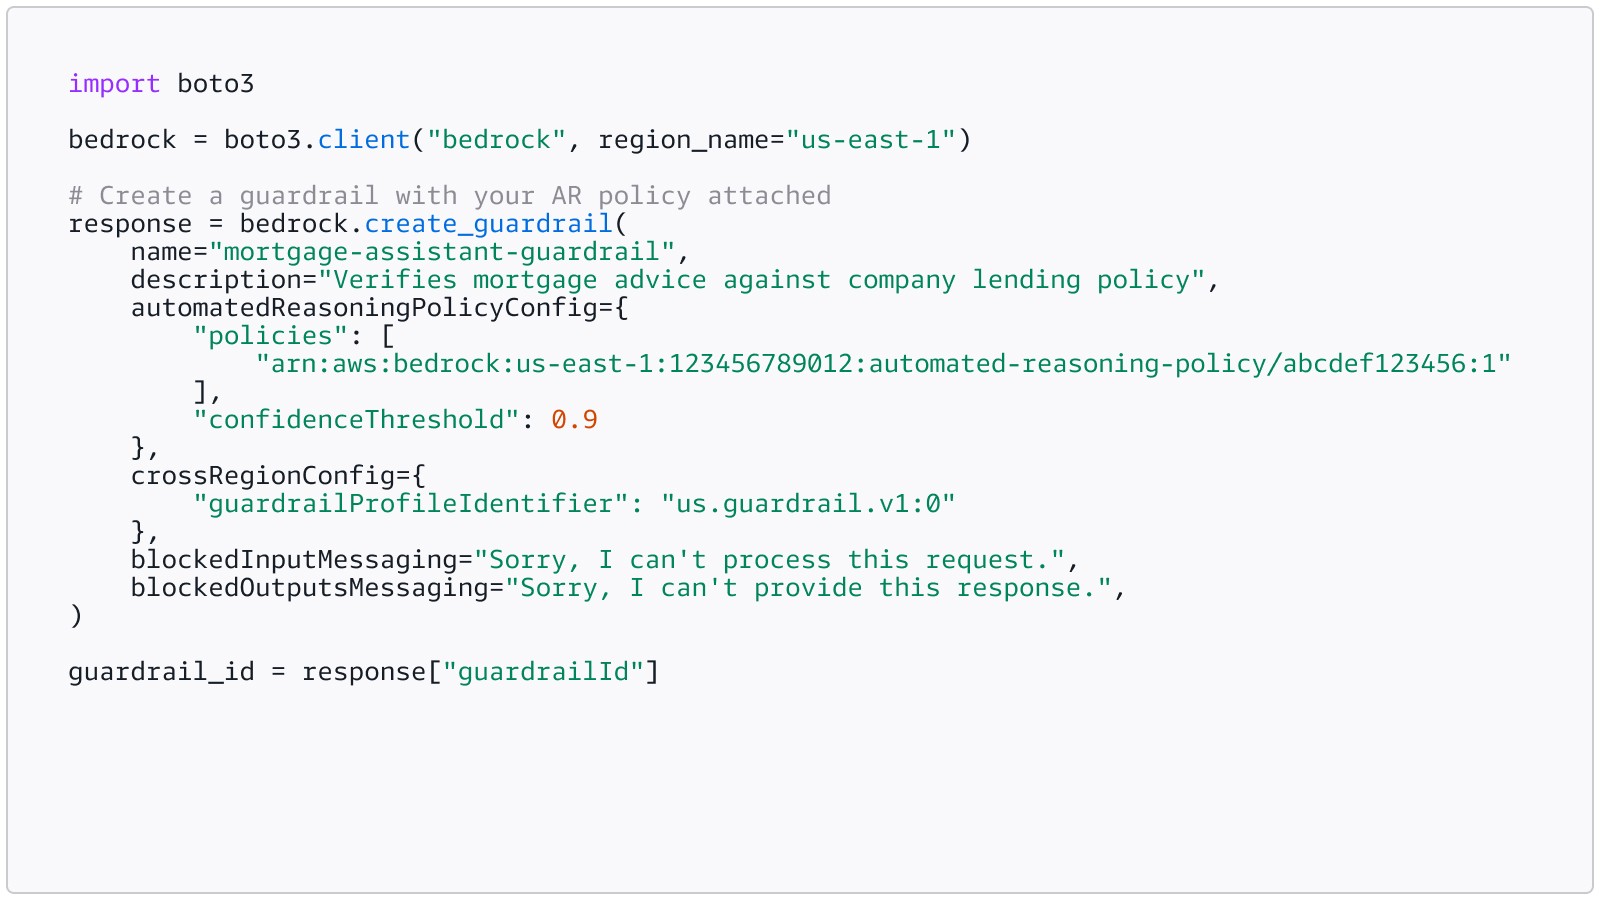
Key details:
- policies takes an array of policy ARN strings (max 2), not objects
- confidenceThreshold (optional, 0.0 to 1.0) controls the minimum agreement level for translations to be considered reliable. Lower values (0.3) surface more findings sooner; higher values (1.0) optimize strictly for soundness. Start low during development, tighten for production
- crossRegionConfig is required for AR checks; it enables cross-region inference for guardrail evaluation. Use the profile for your geography (e.g., us.guardrail.v1:0 for US, eu.guardrail.v1:0 for EU)
- blockedInputMessaging and blockedOutputsMessaging are required; these are the fallback messages shown when other guardrail components (not AR) block content
- Use a numbered version (:1) in the ARN for production. Reserve DRAFT for development only
Step 3: Validate LLM responses with ApplyGuardrail
The recommended integration pattern is the ApplyGuardrail standalone API. This gives you full control over what content is validated and when, and it is the approach AWS documentation explicitly recommends for AR checks.
Here is a minimal integration example added to your existing inference pipeline:
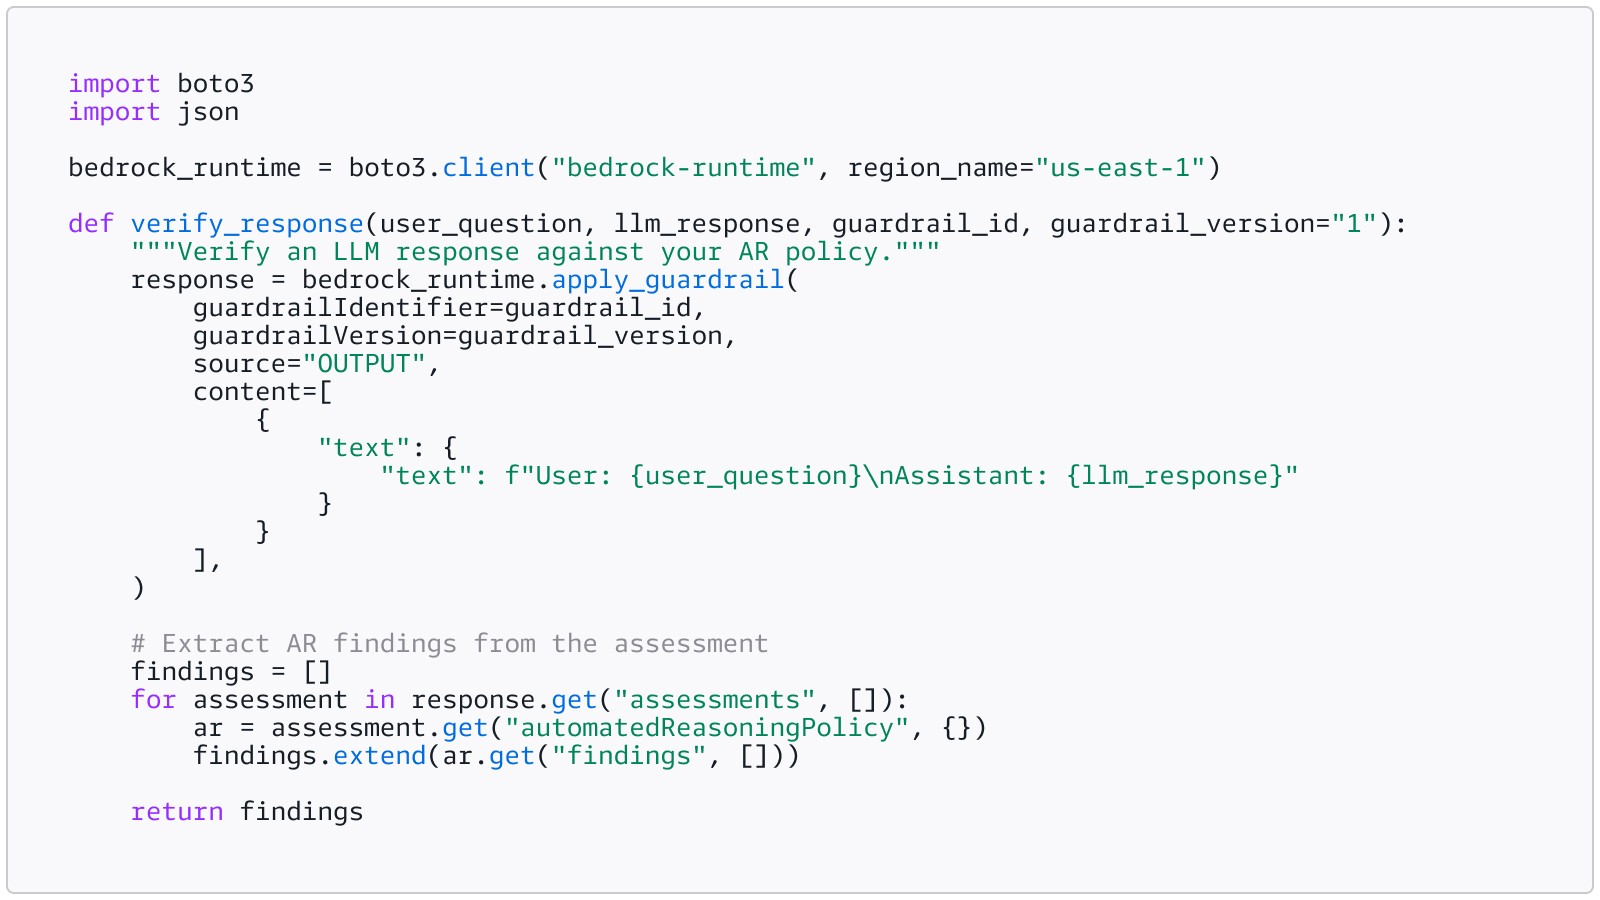
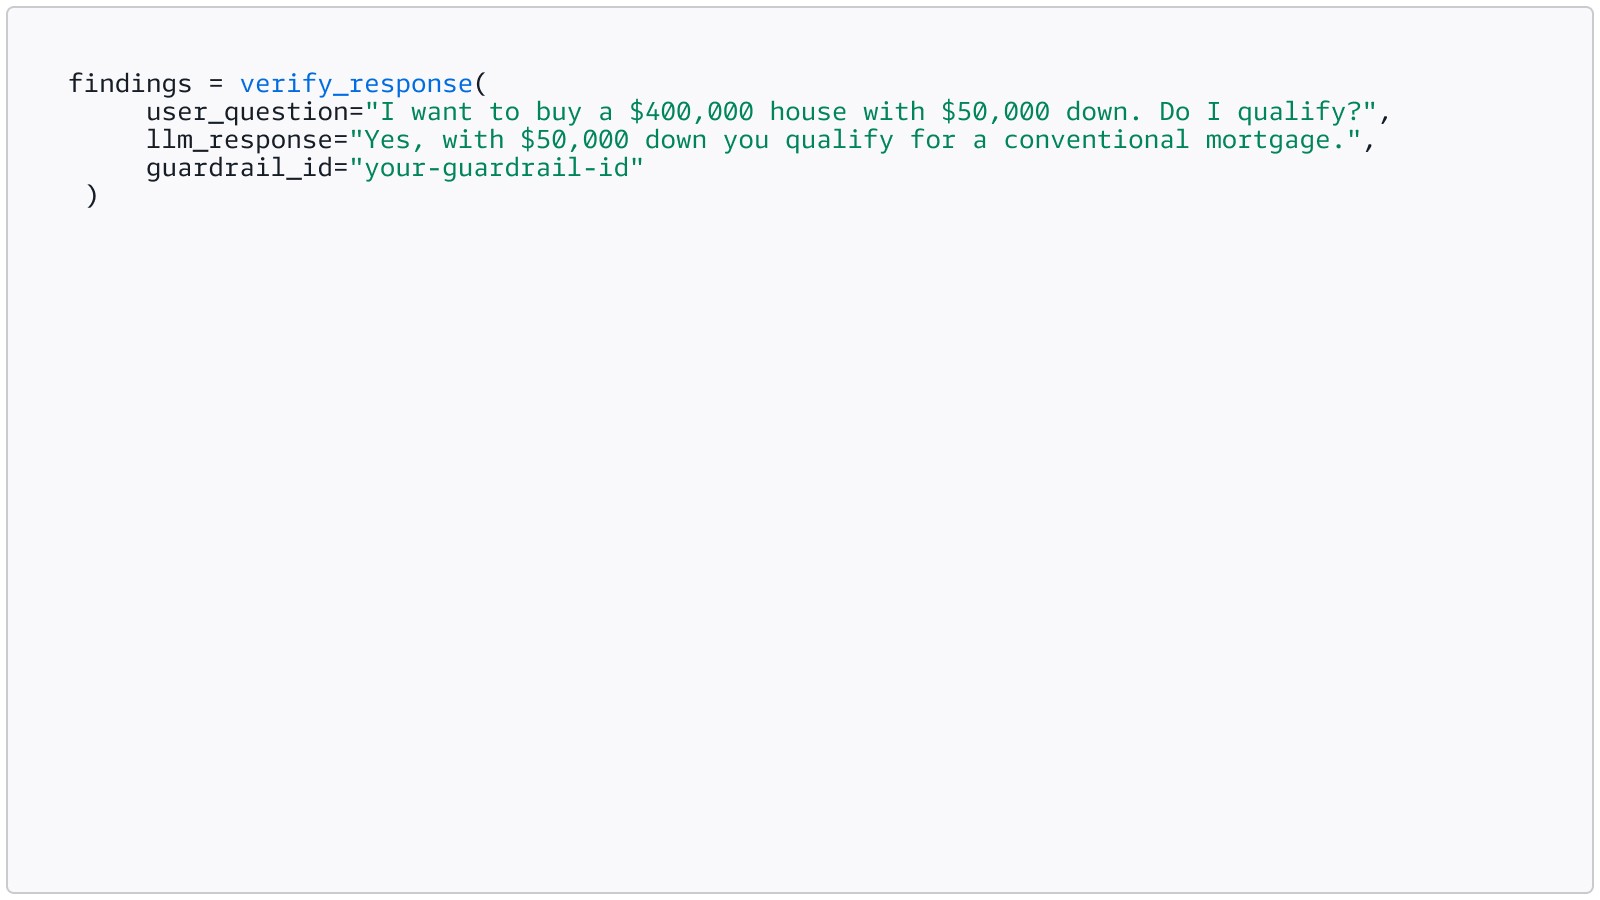
Call this after your LLM generates a
response, before you serve it to the user:
Important: AR checks operate in detect
mode. They return findings and feedback. They do not block or rewrite the
response automatically. Your application inspects the findings and decides what
to do.
Step 4: Handle findings
Each finding is a union type with exactly one key present. Here is how to parse them and act:
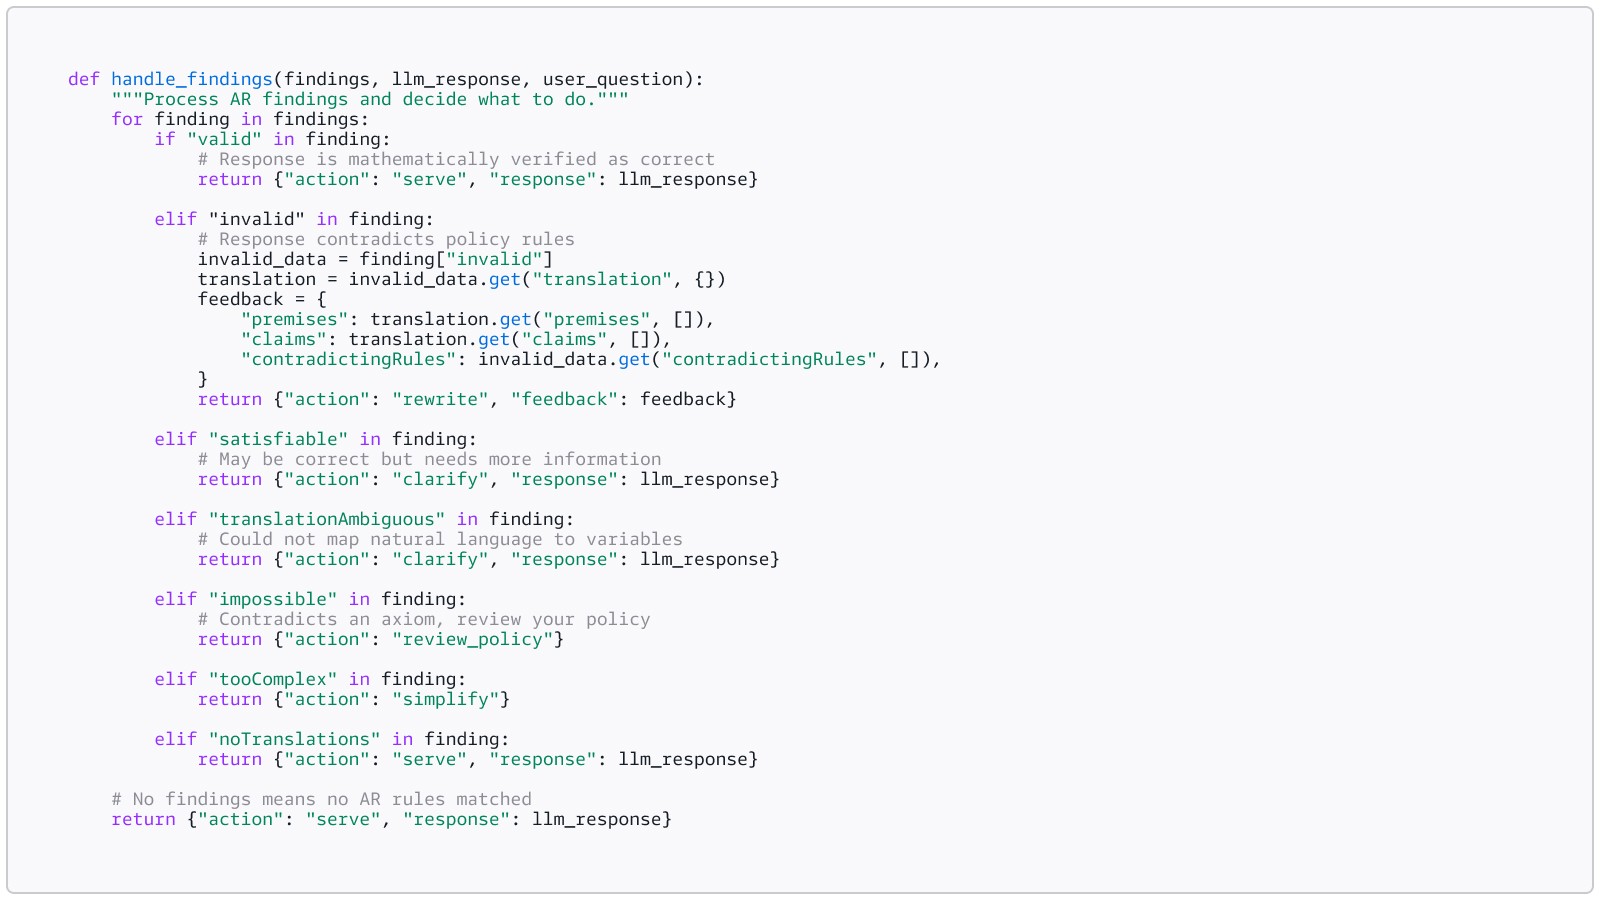
The standard remediation pattern is a validation-rewrite loop: validate the response, feed any violations back to the model, regenerate the answer, and revalidate. Repeat until the response is valid or a retry limit is reached.
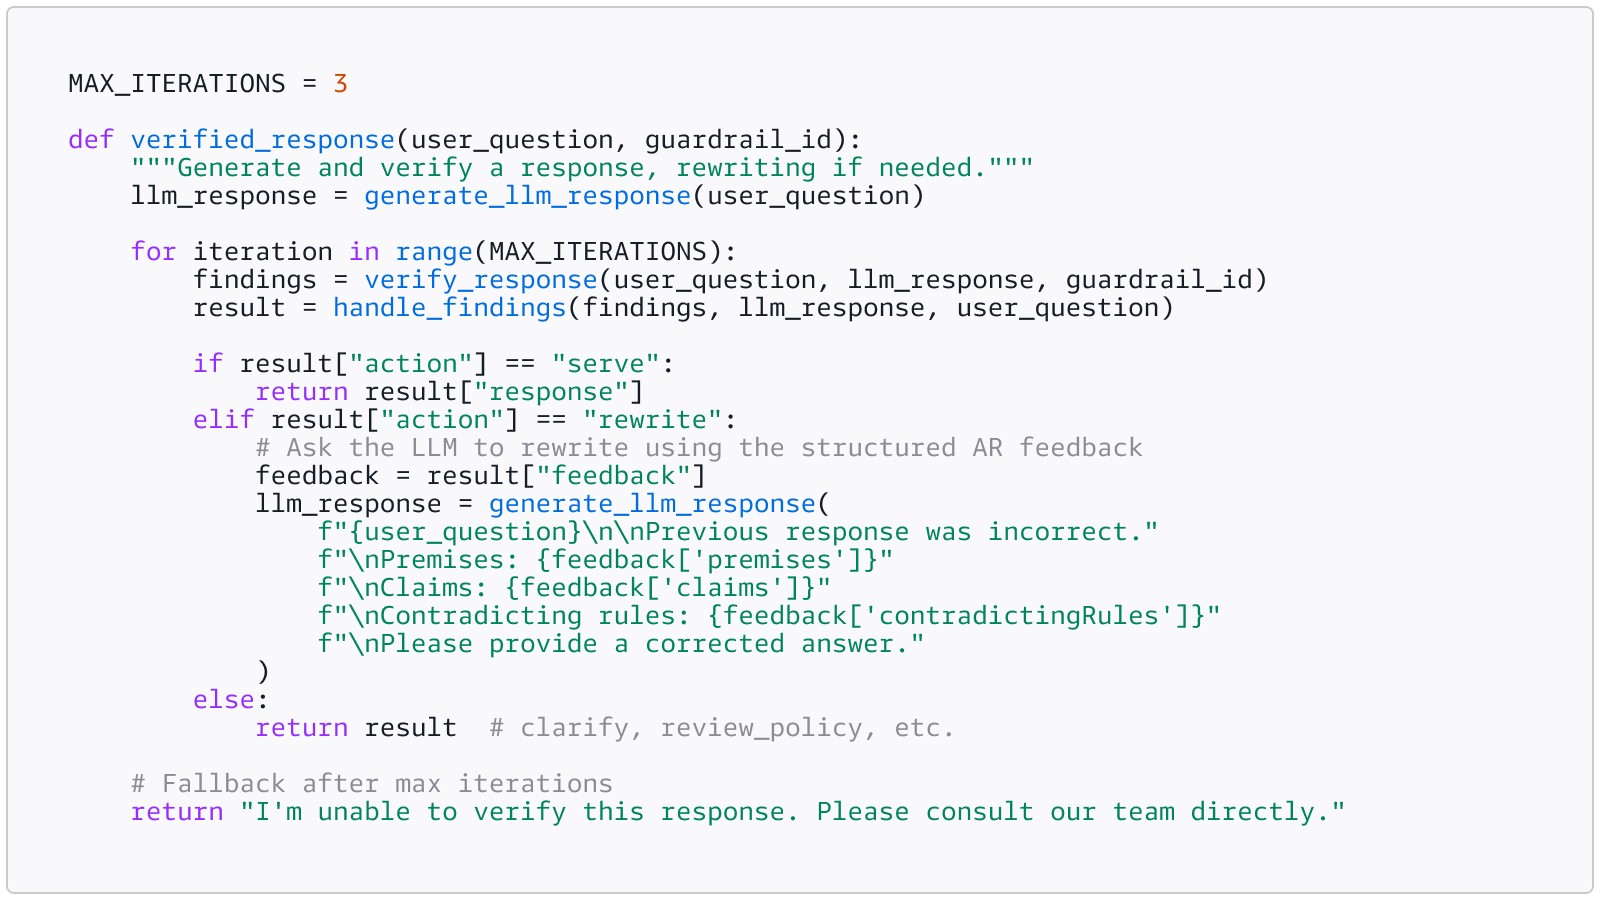
Your user never sees the rewriting loop. They see a correct answer on the first try. The iteration happens in milliseconds behind the scenes.
Step 5: Build an audit trail
Every verification iteration should be logged. When your enterprise customer asks for SOC 2 evidence, or your regulator asks how you verified a specific decision, you pull the JSON log. Every verification is timestamped and traceable.
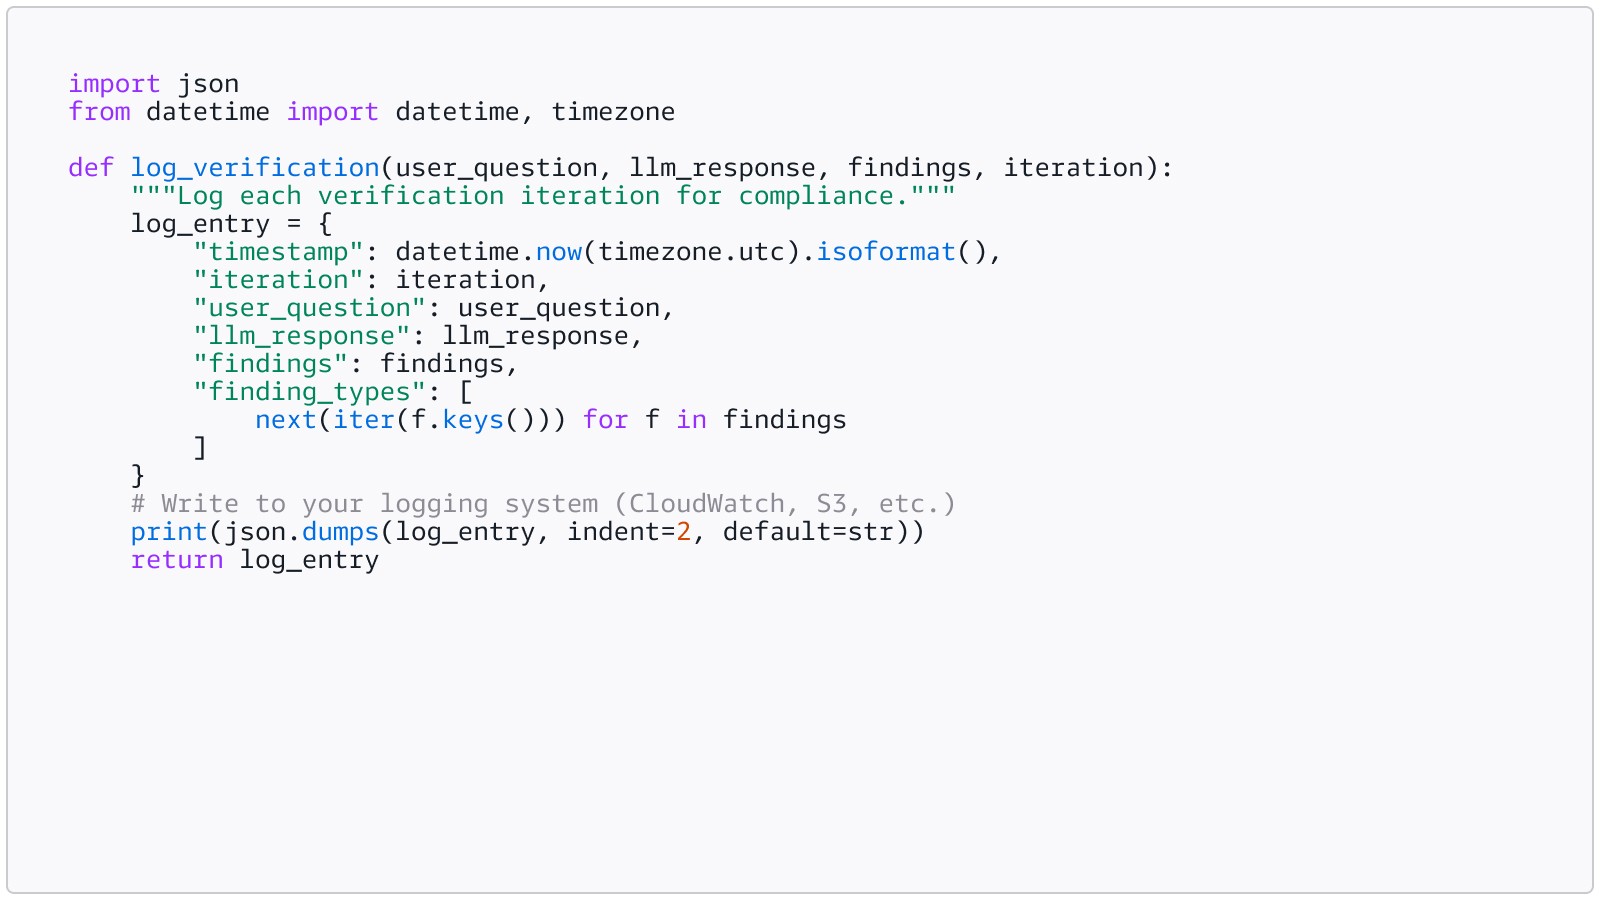
This log becomes your compliance artifact. It shows what the user asked, what the LLM generated, what AR found, and what action your application took. For startups pursuing SOC 2, HIPAA compliance, or enterprise sales, this audit trail is not optional. It is the evidence that your system works as documented.
Step 6: Secure your agents with AgentCore Policy
If your startup has moved beyond chatbots into agentic workflows (your AI books appointments, processes refunds, queries databases, or sends emails), you need boundaries on what your agent can do, not just what it says.
Policy in Amazon Bedrock AgentCore uses Cedar to define these boundaries. For example, a healthcare appointment scheduling agent needs policies that restrict which patient records it can access, limit scheduling actions to business hours, and prevent it from processing refunds above a threshold without manager approval. Start in LOG_ONLY mode to observe what your agent is doing without blocking anything. Once you trust the policies, switch to ENFORCE mode for production.
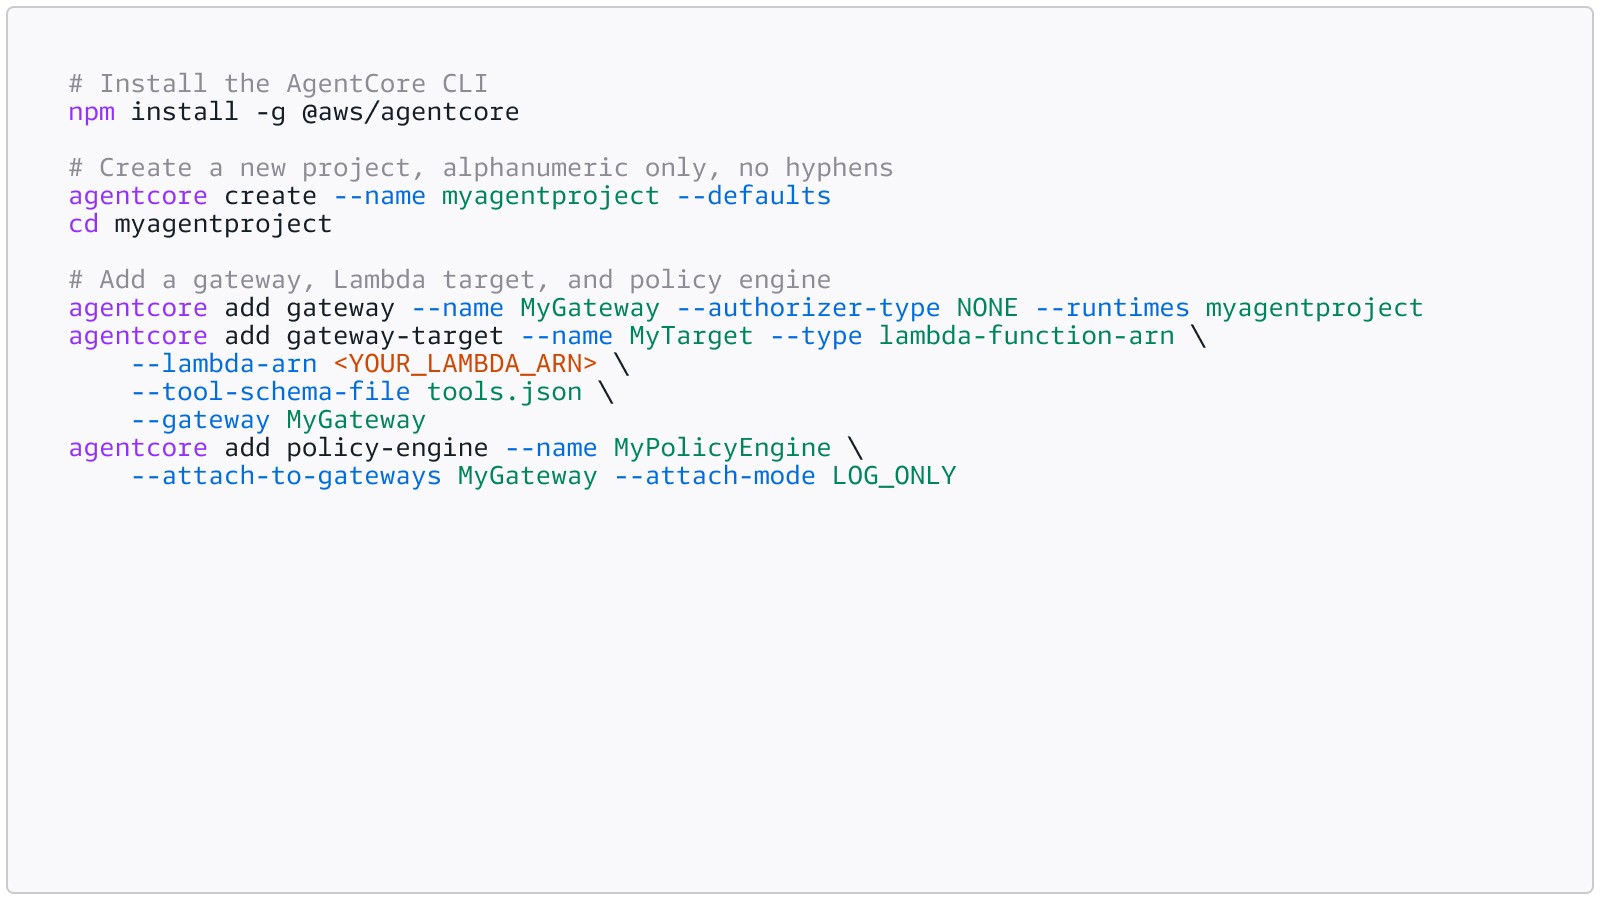
The Gateway is the enforcement layer between your agent and its tools. Every tool invocation passes through the Gateway, where Cedar policies are evaluated before the request reaches the target. This is what makes enforcement deterministic and independent of the agent's reasoning: the agent cannot bypass, ignore, or talk its way past the Gateway.
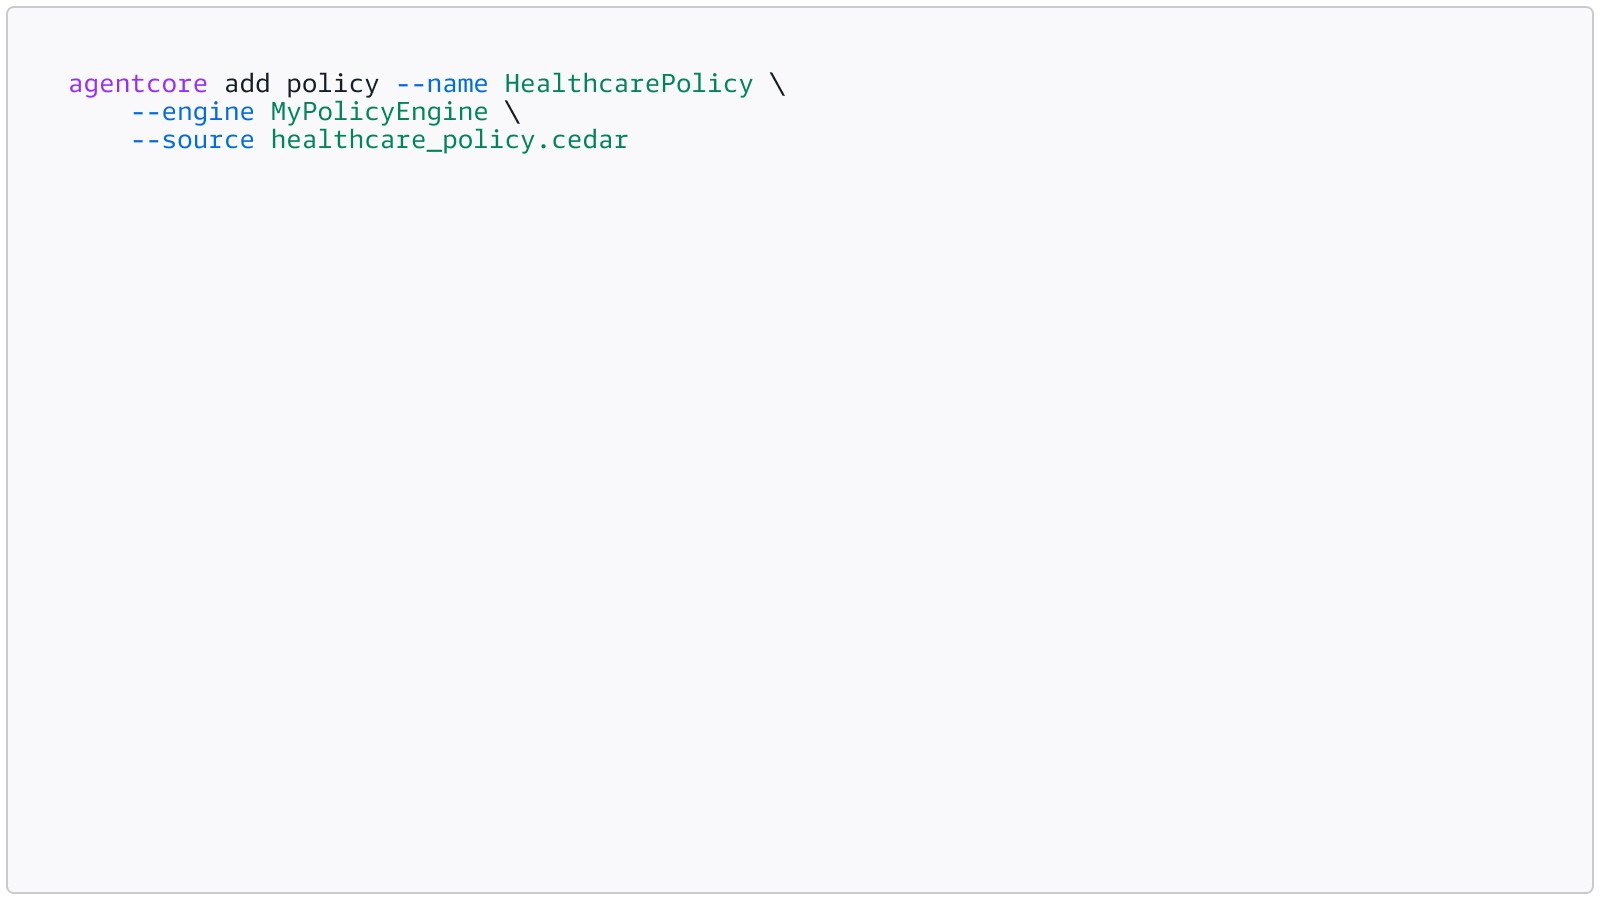
Set up a Gateway and Policy Engine using the AgentCore CLI:
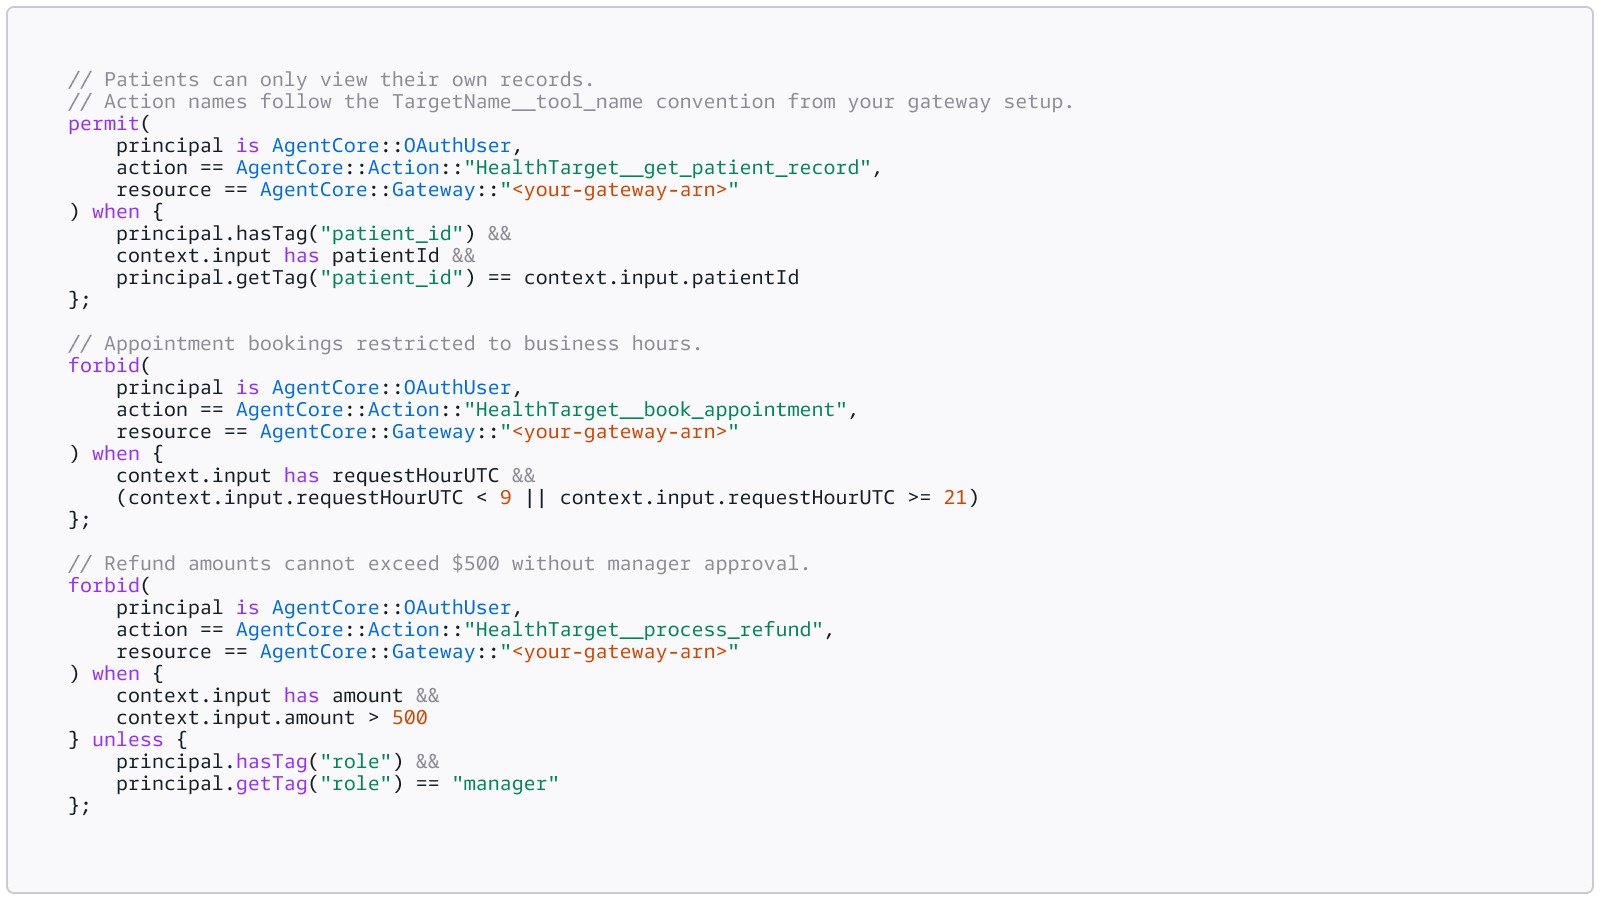
Write a Cedar policy and attach it to the policy engine. The following example shows illustrative policies for a healthcare appointment agent. In practice, your action names are auto-generated from your gateway target and tool schema (e.g., HealthTarget__get_patient_record), and the resource must reference your specific gateway ARN:
Cedar is default-deny: every agent-tool interaction is blocked unless an explicit permit policy allows it. Your permit policies define which tools the agent can call and under what conditions. The forbid policies below carve out exceptions, blocking specific scenarios even when a broader permit would otherwise allow them.
Save this as healthcare_policy.cedar, then attach it to the policy engine:
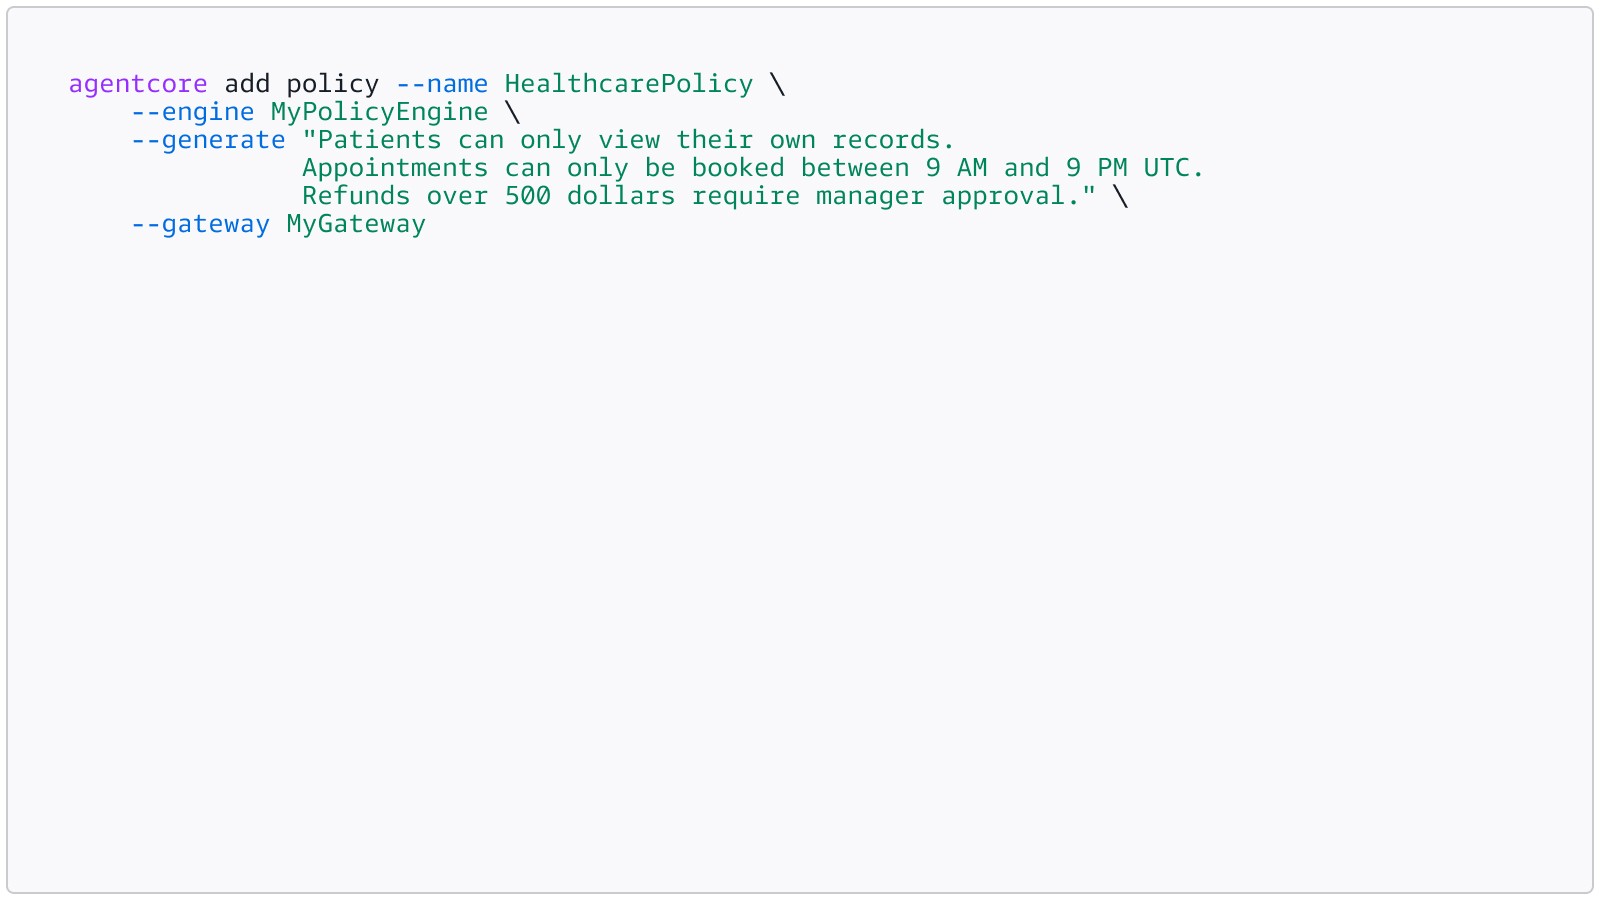
Alternatively, you can describe your rules
in natural language and let the system generate Cedar for you (requires the
gateway to be deployed first):
Automated reasoning validates the policies at authoring time, catching overly permissive, overly restrictive, or ineffective rules before deployment.
The key properties that matter for
regulated startups:
- Default-deny: if no policy explicitly permits an action, it is blocked
- Forbid always wins: hard-stop rules cannot be overridden by other policies
- Deterministic enforcement: operates at the gateway boundary, outside your agent's reasoning. Cannot be bypassed by prompt injection, hallucination, or bugs
Start in LOG_ONLY mode to see what your agent is doing without breaking your product. The logs show which policy enacted on each request to the gateway, the outcome of the policy decision (permit or deny), and surface mismatched policies when tool drift occurs. Review them. Refine the policies. When you are confident, switch to ENFORCE. This is how you go from prototype to production without disrupting your users.
For complete examples including deployment scripts and test harnesses, see the Amazon Bedrock AgentCore samples on GitHub.
What happens after you deploy automated reasoning?
Once you have AR checks and AgentCore Policy running, you unlock something more valuable than error prevention: a single source of truth.
Your AR policy is your business rules encoded as formal logic. When those rules change (and they always do: new regulations, updated lending criteria, revised clinical protocols), you update the source document, regenerate the policy, and immediately every AI system in your stack complies with the new rules. No prompt engineering to update. No model retraining. No hoping someone remembered to change the system prompt.
This eliminates an entire class of drift bugs. Your documentation and your AI behavior are mathematically linked. They cannot fall out of sync.
As guardrails are model-agnostic, your verification layer stays the same when you switch foundation models. The same AR policy that verified Claude's responses verifies Amazon Nova's. The rules depend on your business logic, not the model.
The integration extends across the Bedrock ecosystem: AR policies work with Knowledge Bases for retrieval-augmented generation, with AgentCore agents for multi-step workflows, and with the full range of foundation models. You are building on a platform, not a point solution.
Learn more
- Automated Reasoning checks documentation
- AR Concepts (variables, rules, findings)
- Integration guide (ApplyGuardrail patterns)
- AgentCore Policy documentation
- AgentCore samples on GitHub
- AWS Provable Security overview
- What is Automated Reasoning
- Cedar language (CNCF)
That’s a wrap on our AR for startups series
Across the Prove It series, our thesis has been the same: startups building on AI need deterministic, mathematical verification, not just probabilistic safeguards.
In Part 1, we covered why the trust problem is existential for startups and how AWS' decades of work in formal methods led to Bedrock Guardrails and AgentCore Policy.
In Part 2, we looked under the hood of formal logic, the verification pipeline, and the economics. In this post, you saw the complete implementation path from existing compliance documents to production-ready verified AI.
The startups that win in the AI era will not just build intelligent systems; they will build systems they can prove are correct. Automated reasoning and AgentCore Policy make that possible today, using the policies and compliance documents most companies already have. The only remaining question is: will you start now or after the first incident forces your hand?
.jpg)
Harshvardhan Chunawala
Harshvardhan Chunawala ist Solutions Architect bei AWS sowie Authorized Educator der AWS Academy und lebt in den USA. Er arbeitet weltweit mit Führungskräften großer Unternehmen, Startup-Gründern und Vorstandsmitgliedern zusammen, um für verschiedene Branchen skalierbare und sichere Cloud-Infrastrukturen in AWS zu entwickeln. Er wurde mit dem AWS Golden Jacket ausgezeichnet und kooperiert mit mehreren Amazon-Teams, um wegweisende Cloud-Funktionen für Sicherheits- und Satellitenservices sowie für vertrauenswürdige agentenbasierte KI-Services zu gestalten und bereitzustellen. Neben seiner Tätigkeit bei AWS ist er ein weltweit anerkannter Technologe und Experte für Cloud-Sicherheit mit über 10 Jahren Erfahrung. Darüber hinaus ist er an der Carnegie Mellon University tätig, wo er an der Forschung und am Mentoring in den Bereichen Cloud Computing und neue Technologien mitwirkt. Zu seinen Hobbys zählen das Fallschirmspringen und das Fliegen.

Mike Miller
Mike Miller ist Director of AI Product Management bei AWS, wo er bei wichtigen Initiativen im Bereich der generativen KI beratend tätig ist. Dazu gehören Automated-Reasoning-Funktionen zur Vermeidung von Halluzinationen, Amazon Q und Amazon Bedrock. Er machte PartyRock, eine No-Code-Plattform zur Entwicklung generativer KI-Anwendungen, öffentlich zugänglich, nachdem sich eine interne Version davon unter den Amazon-Mitarbeitenden extrem großer Beliebtheit erfreut hatte. Zuvor leitete Mike das AWS-Team Machine Learning Thought Leadership. Dort brachte er AWS DeepLens, AWS DeepRacer und AWS DeepComposer auf den Markt, womit er Entwicklern weltweit auf unterhaltsame und ansprechende Weise praktische Erfahrungen mit Machine Learning ermöglichte. Mike ist seit über 13 Jahren bei Amazon tätig. Vor seinem Wechsel zu AWS leitete er das Produktmanagement für Fire TV bei Lab126.

Rahul Kumar
Dr. Rahul Kumar ist Senior Applied Science Manager bei AWS, wo er die Entwicklung von Verifizierungstechnologien für Rust- und C-Programme und die Weiterentwicklung der neuro-symbolischen KI leitet, die große Sprachmodelle mit Automated Reasoning kombiniert. Bei AWS treibt Rahul Open-Source-Initiativen voran, darunter den Modellprüfer Kani und die Challenge „Verify the Safety of the Rust Standard Library“. Er promovierte an der Brigham Young University und arbeitete zuvor im Bereich der formalen Verifizierung und statischen Analyse bei Microsoft Research und im NASA Jet Propulsion Laboratory sowie als Dozent am Caltech. Er setzt sich leidenschaftlich dafür ein, Automated Reasoning einem breiteren Publikum zugänglich zu machen, und hält Vorträge darüber, wie mathematische Beweisverfahren KI-Halluzinationen beseitigen und die Korrektheit von Software gewährleisten können. Er lebt in Seattle, Washington.

Stefano Buliani
Stefano Buliani ist Principal Product Manager in der Automated Reasoning Group bei AWS. Dort leitet er die Bemühungen, mithilfe des Amazon-Bedrock-Integritätsschutzes formale Verifizierungsfunktionen für generative KI bereitzustellen. Stefano ist gelernter Softwareentwickler und seit über 12 Jahren bei AWS tätig, und zwar sowohl als Specialist Solutions Architect wie auch als Produktmanager in den Teams für Serverless-Lösungen und Automated Reasoning. In seiner früheren Position unterstützte er Kunden bei der Entwicklung und Skalierung von Serverless-Anwendungen in AWS Lambda und Amazon API Gateway. In seiner Freizeit unternimmt Stefano gerne Ausflüge in die Natur im pazifischen Nordwesten Nordamerikas. Er lebt in Vancouver, Kanada.
Wie war dieser Inhalt?